16 Quick Easy Dessert Recipes for Busy Moms Needing Last-Minute Treats

Nutella Stuffed Crescent Rolls

There is something magical about being able to create a beautiful homemade dessert in minutes, especially on the kind of busy days when time feels impossible to find. Whether you are preparing for unexpected guests, calming a late-night sweet craving, making something fun for the kids, or simply trying to bring comfort to your family after a long day, quick desserts can completely change the mood in your kitchen. The best part is that fast desserts do not have to taste rushed or look plain. With the right ingredients, smart shortcuts, and a little creativity, you can make rich chocolate treats, creamy no-bake delights, fruity layered desserts, and bakery-style sweets that look impressive while requiring very little effort. These easy dessert recipes are designed for busy moms who want delicious results without spending hours baking, cleaning, or stressing in the kitchen.

1. Chocolate Mug Cake with Gooey Melted Center

Chocolate Mug Cake with Gooey Melted Center

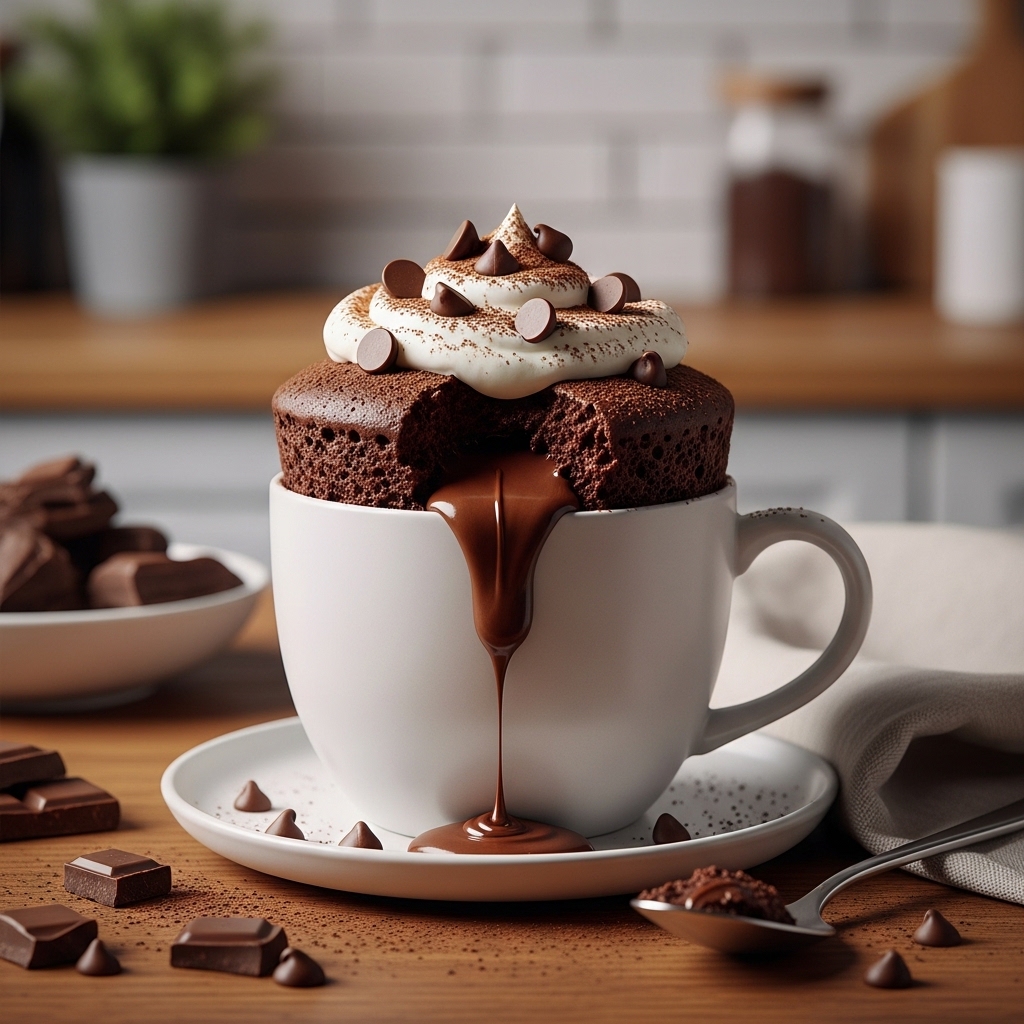
Few desserts feel as comforting and satisfying as a warm chocolate mug cake fresh from the microwave. This quick dessert is rich, soft, deeply chocolatey, and incredibly easy to make using simple pantry ingredients. The texture is moist and fluffy around the edges while the center stays slightly gooey and molten, creating a luxurious dessert experience in just a few minutes. Served in a modern ceramic mug with melted chocolate chips on top and a light dusting of cocoa powder, this dessert feels both cozy and indulgent. It is the perfect last-minute treat when cravings hit unexpectedly or when you need a fast dessert without turning on the oven. Busy moms especially love this recipe because it requires almost no cleanup while still tasting like a bakery-style chocolate cake.

What is Special About This Recipe

What makes this chocolate mug cake truly special is how quickly it transforms basic ingredients into a warm dessert that tastes homemade and comforting. Unlike traditional cakes that require mixing bowls, baking pans, and long baking times, this recipe comes together directly inside a mug. The microwave creates a soft sponge-like cake in less than two minutes, making it one of the fastest dessert options available.

Another reason this recipe stands out is its versatility. You can easily customize it by adding peanut butter, caramel, chopped nuts, marshmallows, or white chocolate chips. The cake also works beautifully with vanilla ice cream, whipped cream, or fresh berries. It is especially useful for busy evenings because it satisfies dessert cravings instantly without creating a sink full of dishes afterward.

The gooey center is the true highlight of this dessert. Adding extra chocolate pieces in the middle before microwaving creates a rich molten texture that feels luxurious and decadent. The secret is not overcooking the cake, which helps preserve the soft and tender texture.

Ingredients

  • 4 tablespoons all-purpose flour
  • 2 tablespoons cocoa powder
  • 2 tablespoons granulated sugar
  • 1/4 teaspoon baking powder
  • Pinch of salt
  • 3 tablespoons milk
  • 2 tablespoons vegetable oil or melted butter
  • 1/4 teaspoon vanilla extract
  • 2 tablespoons chocolate chips
  • Optional whipped cream or ice cream for serving

Preparation Instructions

In a microwave-safe mug, combine the flour, cocoa powder, sugar, baking powder, and salt. Stir thoroughly to remove any lumps, especially from the cocoa powder. Add the milk, oil, and vanilla extract, then mix until the batter becomes smooth and glossy.

Fold in half of the chocolate chips and reserve the rest for the center and topping. Place a few chocolate chips directly into the middle of the batter to create the gooey molten center during cooking.

Microwave the mug cake for about 60 to 90 seconds depending on the strength of your microwave. The top should look set while the center remains slightly soft. Avoid overcooking because the cake can quickly become dry and rubbery. Let the cake rest for one minute before serving because the heat continues cooking the center slightly after microwaving.

Top with whipped cream, ice cream, or extra chocolate sauce for a richer dessert experience. If you want a stronger chocolate flavor, use dark cocoa powder instead of regular cocoa powder.

This chocolate mug cake proves that even the busiest evenings can end with something warm, sweet, and comforting. It is one of those emergency desserts that quickly becomes a family favorite because it feels special despite requiring almost no effort at all.

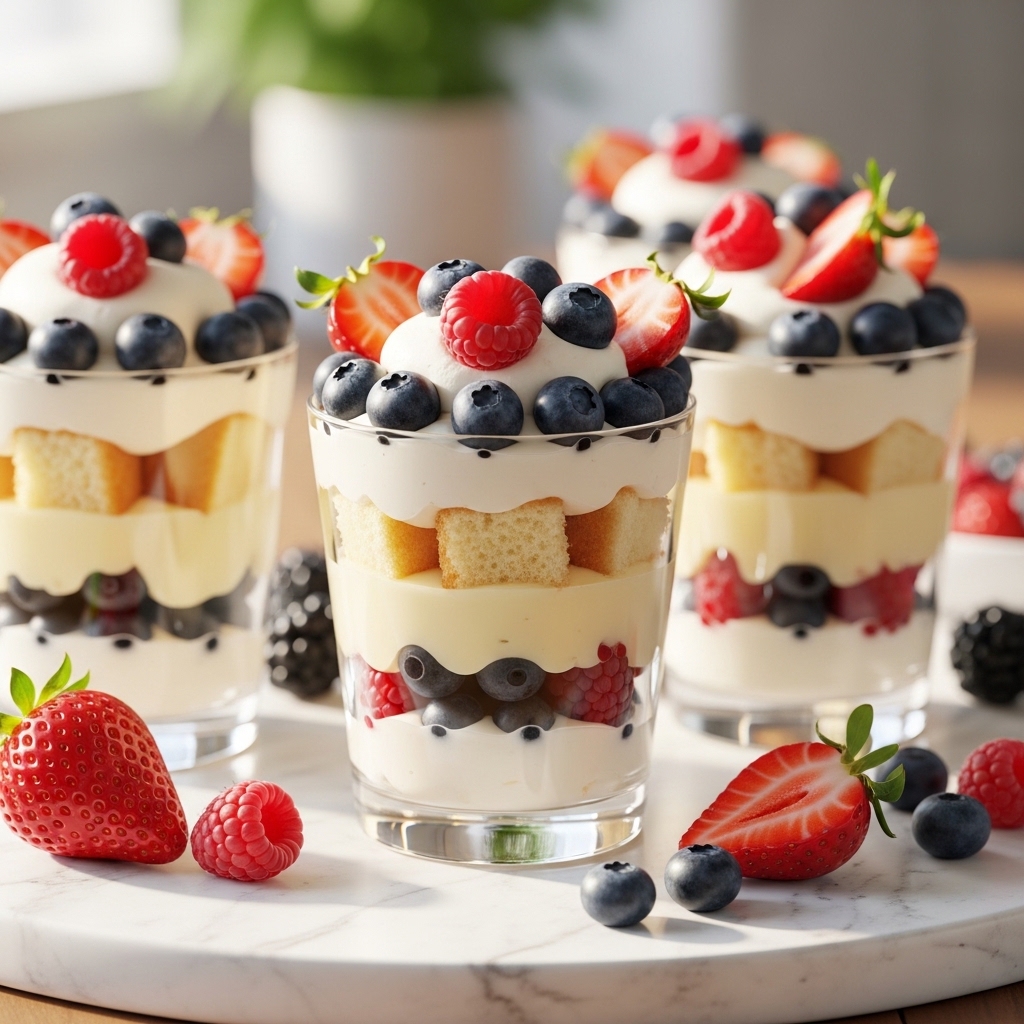
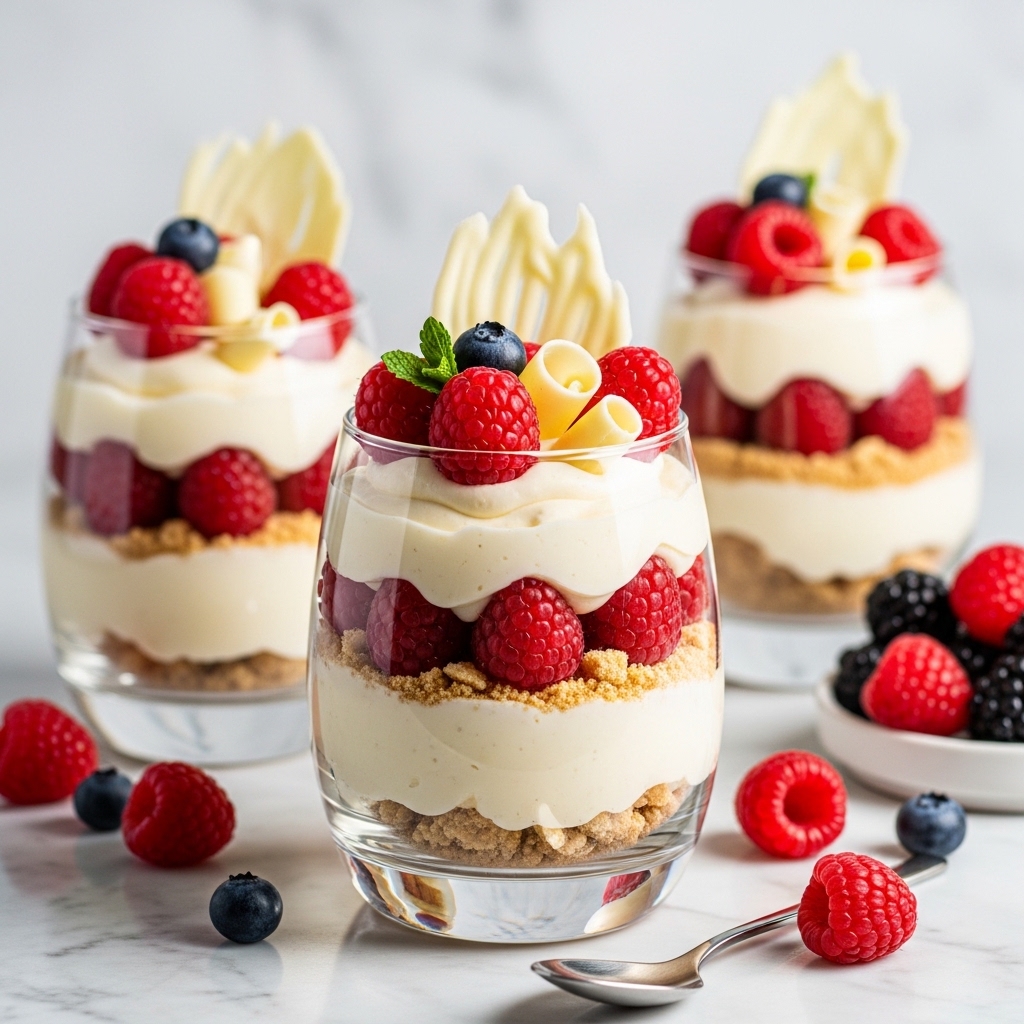
2. Strawberry Cheesecake Parfaits

Strawberry Cheesecake Parfaits

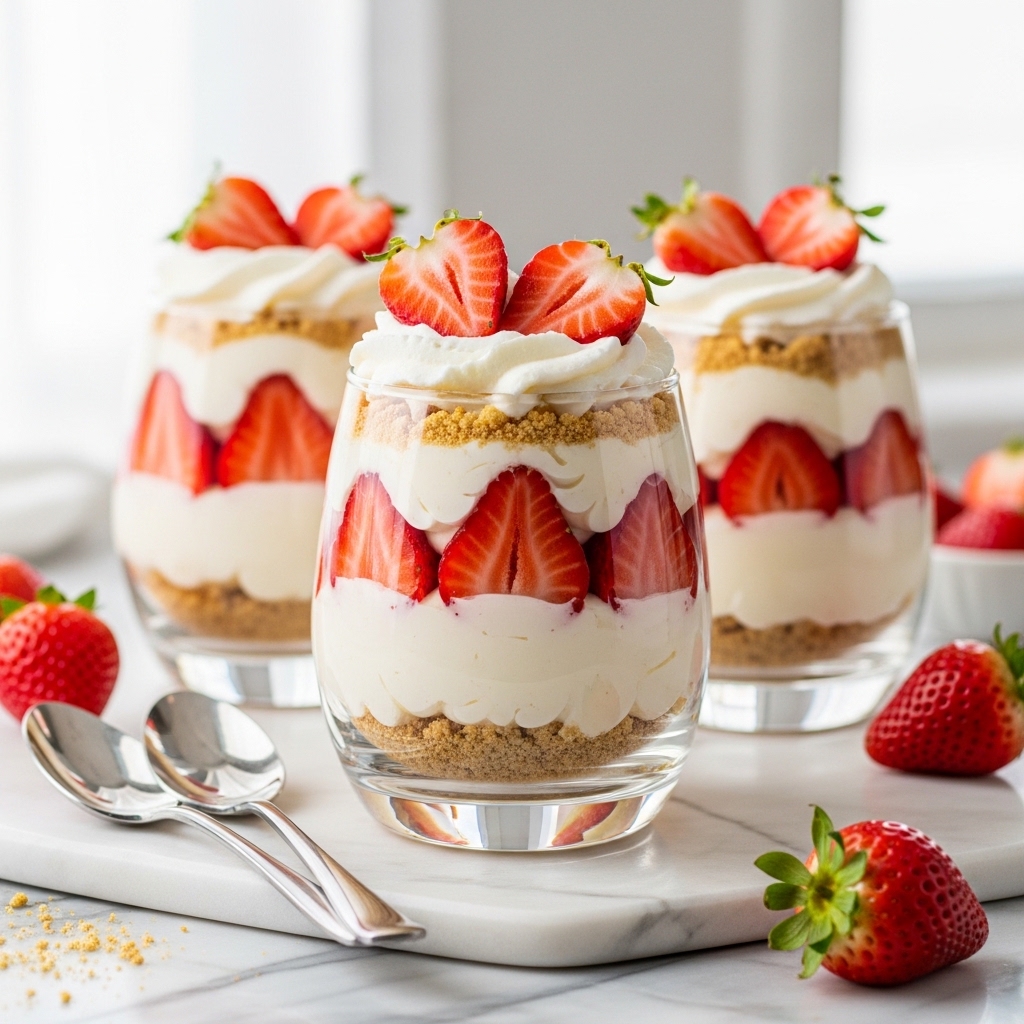
Strawberry cheesecake parfaits are one of the most elegant no-bake desserts you can prepare in minutes. These layered treats combine creamy cheesecake filling, buttery cookie crumbs, and juicy strawberries inside clear dessert glasses that beautifully showcase every colorful layer. The contrast between the rich cream cheese mixture and the fresh fruity topping creates a dessert that tastes light yet indulgent at the same time. Each spoonful delivers creamy, crunchy, sweet, and slightly tangy flavors that feel refreshing and satisfying.

The beauty of these parfaits lies in how effortlessly impressive they look. Even though they require minimal preparation, they resemble something served at a café or upscale bakery. Busy moms love them because they can be prepared ahead of time, customized with different fruits, and served directly in individual cups without complicated plating.

What is Special About This Recipe

These strawberry cheesecake parfaits are special because they capture the flavor of classic cheesecake without requiring baking, water baths, or hours of cooling. Traditional cheesecake can be time-consuming and intimidating, but this version simplifies everything while still delivering creamy and luxurious results.

The layers create a visually stunning dessert that instantly grabs attention on the table. The vibrant red strawberries against the pale cheesecake filling and golden cookie crumbs make this dessert especially attractive for parties, family gatherings, and Pinterest-worthy presentations.

Another major advantage is flexibility. You can use graham crackers, vanilla cookies, digestive biscuits, or even chocolate cookies for the crumb layer. The fruit topping can also be adjusted depending on the season. Blueberries, raspberries, peaches, or mangoes work beautifully as substitutes.

Because these parfaits are chilled before serving, they are ideal for warm weather or hectic days when you need a refreshing dessert that can sit ready in the refrigerator until needed.

Ingredients

  • 1 cup cream cheese, softened
  • 1/2 cup heavy whipping cream
  • 1/3 cup powdered sugar
  • 1 teaspoon vanilla extract
  • 1 1/2 cups fresh strawberries, sliced
  • 1 cup crushed graham crackers or vanilla cookies
  • 2 tablespoons melted butter
  • Optional strawberry syrup or jam for extra flavor

Preparation Instructions

Begin by crushing the graham crackers or cookies into fine crumbs. Mix the crumbs with melted butter until the texture resembles wet sand. Set aside while preparing the filling.

In a large bowl, beat the softened cream cheese until smooth and creamy. Add powdered sugar and vanilla extract, then continue mixing until fully combined. In a separate bowl, whip the heavy cream until soft peaks form. Gently fold the whipped cream into the cream cheese mixture to create a light and fluffy cheesecake filling.

To assemble the parfaits, place a layer of cookie crumbs at the bottom of each serving glass. Add a layer of cheesecake filling, followed by sliced strawberries. Repeat the layers until the glasses are filled. Finish with extra strawberries and a sprinkle of crumbs on top for a polished presentation.

Chill the parfaits for at least 30 minutes before serving to allow the layers to settle and the flavors to blend together. Avoid overmixing the whipped cream into the filling because it can flatten the airy texture.

For extra flavor, drizzle strawberry syrup or jam between the layers. If preparing ahead, add the final crumb topping shortly before serving to keep it crunchy.

These strawberry cheesecake parfaits deliver bakery-quality flavor with almost no stress involved. They are creamy, refreshing, visually beautiful, and perfect for busy moms who need a quick dessert that still feels elegant and memorable.

3. No-Bake Peanut Butter Chocolate Bars

No-Bake Peanut Butter Chocolate Bars

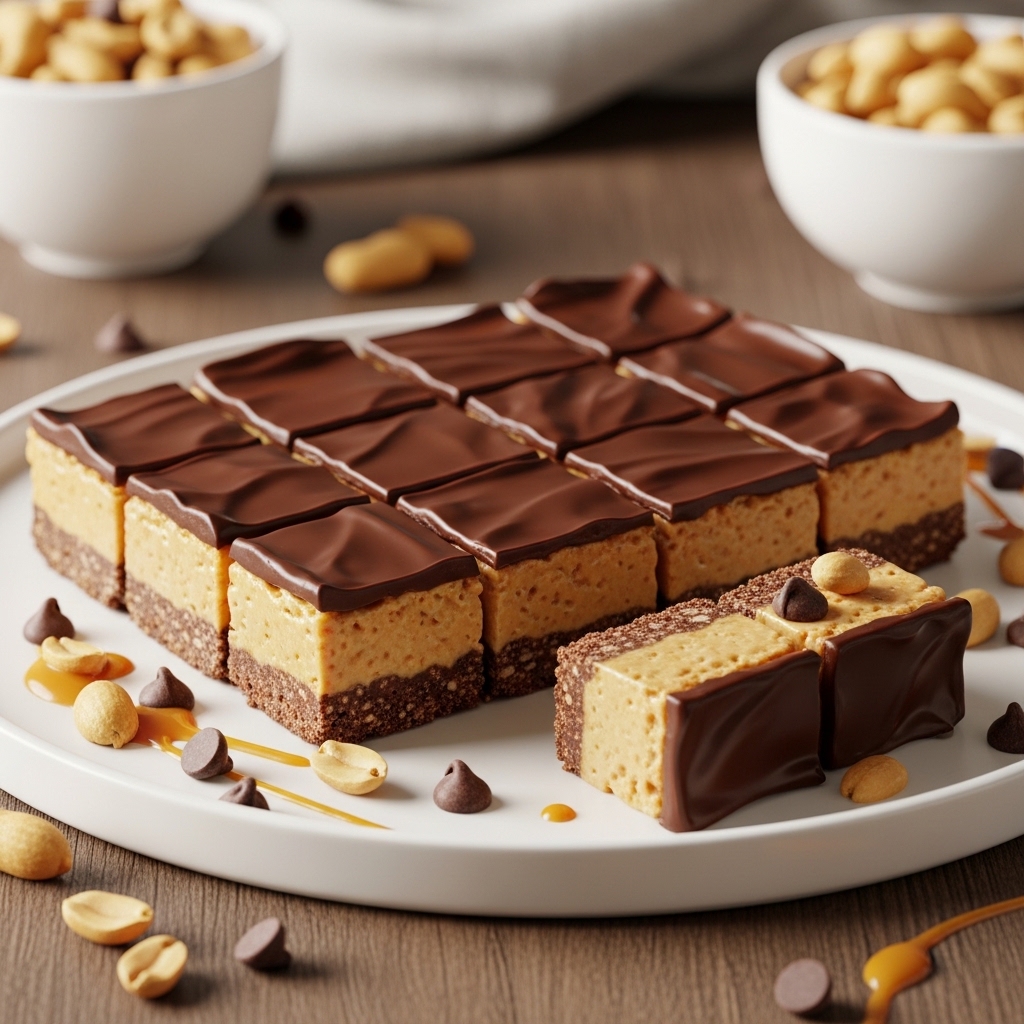
No-bake peanut butter chocolate bars are the ultimate combination of rich chocolate and creamy peanut butter layered into one irresistible dessert. These bars feature a soft peanut butter base topped with silky melted chocolate that hardens into a smooth glossy layer after chilling. Every bite tastes rich, sweet, salty, and satisfying all at once. The texture is soft and fudgy underneath with a slight crunch from crushed cookies or graham crackers mixed into the base.

This dessert is especially popular because it tastes similar to peanut butter cups but requires far less effort. There is no baking involved, which makes it perfect for busy moms looking for a dependable last-minute dessert. The bars also slice beautifully into squares, making them ideal for parties, lunchboxes, family snacks, or quick sweet treats during busy weekdays.

What is Special About This Recipe

The biggest advantage of these bars is their simplicity. They require very few ingredients, minimal preparation time, and almost no kitchen equipment. Despite that, the flavor feels rich enough to compete with bakery desserts and store-bought candy bars.

Another thing that makes this recipe special is the balance of textures and flavors. The peanut butter layer is creamy and slightly salty while the chocolate topping adds sweetness and richness. Together, they create a perfectly balanced dessert that appeals to both children and adults.

These bars are also extremely beginner-friendly. Even someone with little baking experience can successfully prepare them. Since there is no oven involved, there is less risk of burning, drying out, or overbaking the dessert.

They are also highly customizable. You can add chopped peanuts, crushed pretzels, caramel drizzle, or mini chocolate chips to make the bars even more indulgent and flavorful.

Ingredients

  • 1 cup peanut butter
  • 1/2 cup melted butter
  • 1 cup crushed graham crackers or digestive biscuits
  • 1 cup powdered sugar
  • 1 1/2 cups chocolate chips
  • 2 tablespoons heavy cream or milk
  • Optional chopped peanuts for topping

Preparation Instructions

In a large mixing bowl, combine the peanut butter, melted butter, crushed graham crackers, and powdered sugar. Stir until the mixture becomes thick and evenly combined. Press the mixture firmly into a parchment-lined square baking dish to create the base layer.

In a microwave-safe bowl, melt the chocolate chips with the heavy cream in short intervals, stirring between each interval until smooth and glossy. Pour the melted chocolate over the peanut butter layer and spread evenly using a spatula.

Sprinkle chopped peanuts on top if desired. Refrigerate the bars for at least one hour or until the chocolate layer becomes firm enough to slice cleanly.

Avoid overheating the chocolate because it can become thick or grainy. Stir slowly and gently during melting for the smoothest finish. For neater slices, allow the bars to sit at room temperature for a few minutes before cutting.

These no-bake peanut butter chocolate bars are proof that simple desserts can still feel luxurious and deeply satisfying. Their rich flavor, creamy texture, and effortless preparation make them a dependable favorite for busy moms who need fast dessert solutions without sacrificing taste.

4. Mini Vanilla Berry Trifles

Mini Vanilla Berry Trifles

Mini vanilla berry trifles are the kind of desserts that instantly make a table look more elegant and inviting. These layered treats combine soft cubes of vanilla cake, silky whipped cream, sweet vanilla pudding, and fresh berries in clear serving glasses that beautifully display every colorful layer. The combination of fluffy cake, creamy filling, and juicy fruit creates a refreshing dessert that feels light yet incredibly satisfying. Every spoonful delivers softness, creaminess, sweetness, and a burst of fresh berry flavor that makes it hard to stop at one serving.

These trifles are especially perfect for busy moms because they can be assembled quickly using simple ingredients, including leftover cake or store-bought pound cake. Despite being easy to prepare, they look luxurious and professional, making them ideal for parties, family dinners, birthdays, or last-minute gatherings. The vibrant berries and creamy layers also make this dessert visually stunning, helping it stand out beautifully on Pinterest and social media.

What is Special About This Recipe

What makes mini vanilla berry trifles special is their ability to look impressive while requiring very little effort. Traditional layered desserts often involve baking multiple components from scratch, but this recipe uses smart shortcuts to save time without sacrificing flavor or presentation.

The individual serving glasses are another reason these trifles feel special. They make serving simple, neat, and elegant while showcasing the beautiful colorful layers. The clear glasses allow the bright strawberries, blueberries, raspberries, and creamy filling to become part of the presentation itself.

This dessert is also incredibly flexible. You can use angel food cake, sponge cake, vanilla cupcakes, or pound cake depending on what you already have available. Different fruits can also be used depending on the season. Mangoes, peaches, blackberries, or cherries all work wonderfully.

Because the trifles are chilled before serving, they are refreshing and ideal for warmer days or crowded family events where heavy desserts may feel overwhelming.

Ingredients

  • 3 cups cubed vanilla cake or pound cake
  • 2 cups vanilla pudding
  • 1 1/2 cups whipped cream
  • 1 cup sliced strawberries
  • 1/2 cup blueberries
  • 1/2 cup raspberries
  • 1 teaspoon vanilla extract
  • Optional mint leaves for garnish

Preparation Instructions

Begin by preparing the vanilla pudding according to package instructions if using instant pudding. Allow it to chill briefly before assembling the trifles. If using homemade pudding, ensure it is fully cooled to avoid melting the whipped cream layers.

In serving glasses or small jars, place a layer of cubed cake at the bottom. Add a layer of vanilla pudding followed by whipped cream and fresh berries. Repeat the layers until the glasses are filled nearly to the top.

Finish with extra whipped cream, fresh berries, and optional mint leaves for a fresh polished appearance. Chill the trifles for at least 20 to 30 minutes before serving to allow the cake to absorb some moisture from the pudding and cream.

Avoid overfilling the glasses because the layers can become messy and lose their elegant appearance. If preparing ahead of time, add delicate garnishes like mint shortly before serving to keep them fresh and vibrant.

These mini vanilla berry trifles deliver bakery-style beauty and flavor without complicated baking. They are creamy, fruity, colorful, and incredibly easy to prepare, making them one of the best quick desserts for busy moms who want something both beautiful and delicious.

5. Cinnamon Sugar Air Fryer Donut Holes

Cinnamon Sugar Air Fryer Donut Holes

Cinnamon sugar air fryer donut holes are warm, fluffy, bite-sized treats that taste like they came straight from a bakery, yet they require only a fraction of the time and effort. These golden donut bites are soft on the inside with a lightly crisp exterior coated generously in buttery cinnamon sugar. The aroma alone fills the kitchen with the comforting smell of fresh bakery desserts, making them nearly impossible to resist.

One of the best things about these donut holes is how quickly they come together. Using refrigerated biscuit dough or simple homemade dough allows busy moms to prepare fresh warm donuts without deep frying or complicated techniques. Served warm with chocolate sauce, caramel dip, or vanilla glaze, they instantly become a crowd favorite for kids and adults alike.

What is Special About This Recipe

The air fryer completely transforms this recipe into a faster, lighter, and cleaner dessert option compared to traditional deep-fried donuts. Instead of standing over hot oil and dealing with greasy cleanup, the air fryer creates beautifully golden donut holes using far less oil while still delivering delicious texture.

Another thing that makes this recipe special is the comforting flavor combination of cinnamon, sugar, and warm buttery dough. It feels nostalgic and homemade, making it perfect for cozy evenings, family movie nights, or quick weekend desserts.

These donut holes are also highly customizable. You can fill them with chocolate spread, fruit jam, or cream cheese filling. Different coatings like powdered sugar, cocoa sugar, or maple glaze can also completely change the flavor profile while keeping the preparation simple.

Because the donut holes are small and easy to serve, they are excellent for parties, lunchboxes, and snack trays.

Ingredients

  • 1 can refrigerated biscuit dough
  • 3 tablespoons melted butter
  • 1/2 cup granulated sugar
  • 1 teaspoon ground cinnamon
  • Optional chocolate sauce or caramel dip

Preparation Instructions

Preheat the air fryer to 350°F. Separate the biscuit dough and cut each biscuit into small bite-sized pieces. Roll each piece gently into a ball shape for even cooking.

Place the dough balls into the air fryer basket in a single layer without overcrowding. Cook for about 5 to 7 minutes or until golden brown and fully cooked inside. Shake the basket halfway through cooking for even browning.

While the donut holes are still warm, brush them lightly with melted butter. In a separate bowl, combine the cinnamon and sugar, then toss the warm donut holes until fully coated.

Serve immediately while warm for the best texture and flavor. Avoid overcooking because the donut holes can dry out quickly. If making multiple batches, keep finished donut holes lightly covered to preserve softness.

These cinnamon sugar air fryer donut holes are the perfect example of how a simple shortcut recipe can still feel homemade, comforting, and incredibly delicious. Their warm bakery-style flavor and quick preparation make them ideal for busy moms needing fast sweet treats that everyone will love.

6. Chocolate-Dipped Strawberry Cheesecake Bites

Chocolate-Dipped Strawberry Cheesecake Bites

Chocolate-dipped strawberry cheesecake bites are luxurious little desserts packed with creamy cheesecake filling, fresh strawberry flavor, and a rich chocolate coating. These bite-sized treats are elegant enough for parties yet easy enough for busy weekdays when you need something special without spending hours in the kitchen. Each bite combines smooth cream cheese filling with sweet strawberries and a crisp chocolate shell that creates the perfect balance of textures.

Visually, these cheesecake bites are stunning. The glossy chocolate coating paired with vibrant strawberries and creamy centers makes them look premium and irresistible. Arranged on a white serving plate with melted chocolate drizzle and fresh berry garnish, they instantly become the centerpiece of any dessert table.

What is Special About This Recipe

What makes these cheesecake bites truly special is how they deliver the flavor of full cheesecake in a fun, portable, bite-sized form. Traditional cheesecakes often require baking, cooling, and careful slicing, but these small treats eliminate all the stress while still delivering rich creamy flavor.

The chocolate coating adds a satisfying crunch that contrasts beautifully with the soft cheesecake center. Using strawberries inside the filling also brings freshness and natural sweetness that keeps the dessert from feeling overly heavy.

Another major advantage is presentation. These cheesecake bites look professional and expensive despite requiring minimal ingredients and preparation time. They are ideal for birthdays, baby showers, holiday trays, or romantic dessert platters.

These bites can also be frozen ahead of time, making them convenient for busy moms who want a ready-to-serve dessert available whenever needed.

Ingredients

  • 1 cup cream cheese, softened
  • 1/4 cup powdered sugar
  • 1 teaspoon vanilla extract
  • 1/2 cup finely chopped strawberries
  • 1 cup chocolate chips
  • 1 teaspoon coconut oil or vegetable oil
  • Graham cracker crumbs for optional coating

Preparation Instructions

In a bowl, mix the softened cream cheese, powdered sugar, and vanilla extract until smooth and creamy. Fold in the chopped strawberries carefully to avoid adding excess liquid to the mixture.

Scoop small portions of the cheesecake mixture and shape them into bite-sized balls. Place them on a parchment-lined tray and freeze for about 30 minutes to firm up.

Melt the chocolate chips with coconut oil in short microwave intervals, stirring until smooth and glossy. Dip each cheesecake bite into the melted chocolate using a fork or dipping tool, allowing excess chocolate to drip off before placing back onto the tray.

Optional graham cracker crumbs can be sprinkled on top before the chocolate hardens. Refrigerate until fully set before serving.

Avoid using overly juicy strawberries because excess moisture can soften the filling too much. Pat the chopped strawberries dry with paper towels if necessary. Also avoid overheating the chocolate, which can cause it to become thick and difficult to coat smoothly.

These chocolate-dipped strawberry cheesecake bites are rich, creamy, refreshing, and visually beautiful. They prove that small desserts can still create a huge impression while remaining simple enough for even the busiest moms to prepare successfully.

7. Caramel Apple Nachos

Caramel Apple Nachos

Caramel apple nachos are a playful and incredibly delicious dessert that transforms fresh apples into a fun shareable sweet treat. Thin slices of crisp apples are layered onto a serving platter and drizzled generously with caramel sauce, melted chocolate, crushed cookies, nuts, candy pieces, and whipped cream. The combination of juicy apples and rich sweet toppings creates a dessert that feels indulgent while still having a refreshing fruity balance.

This dessert is especially popular with families because it is interactive, colorful, and easy to customize. Kids love helping arrange the toppings while adults appreciate how quickly the dessert comes together. The vibrant apple slices combined with glossy caramel and crunchy toppings create a visually exciting dessert that looks impressive without requiring baking.

What is Special About This Recipe

The biggest advantage of caramel apple nachos is their speed and flexibility. Unlike baked desserts that require measuring, mixing, and baking time, this recipe can be assembled in minutes using ingredients you likely already have available.

The dessert also feels lighter and fresher than many heavy sweets because apples remain the main ingredient. The crisp fruit balances the rich caramel and chocolate beautifully, creating a satisfying dessert that does not feel overwhelming.

Another reason this recipe stands out is customization. Every family member can add their favorite toppings, making the dessert feel personal and fun. Crushed pretzels, mini marshmallows, granola, peanut butter drizzle, white chocolate, or crushed candy bars all work wonderfully.

Because there is no baking involved, this dessert is ideal for warm weather, quick parties, after-school snacks, or last-minute entertaining.

Ingredients

  • 3 apples, thinly sliced
  • 1/2 cup caramel sauce
  • 1/3 cup melted chocolate
  • 1/4 cup crushed cookies or graham crackers
  • 1/4 cup chopped nuts
  • Whipped cream for serving
  • Optional mini chocolate candies or sprinkles

Preparation Instructions

Wash and slice the apples thinly. Arrange them evenly across a serving platter or large plate. For best results, use crisp apples like Honeycrisp, Fuji, or Granny Smith because they hold their shape and texture well.

Warm the caramel sauce slightly for easier drizzling. Drizzle caramel generously over the apple slices, followed by melted chocolate. Sprinkle crushed cookies, chopped nuts, and optional candy toppings evenly across the platter.

Serve immediately for maximum freshness and crunch. If preparing slightly ahead of time, toss the apple slices in a little lemon juice to prevent browning.

Avoid using overly soft apples because they can become watery and affect the presentation. Also avoid adding toppings too early if serving later, as crunchy ingredients may soften over time.

Caramel apple nachos are proof that desserts do not need to be complicated to feel exciting and memorable. Their colorful appearance, crunchy textures, and rich sweet flavors make them a guaranteed favorite for busy moms needing fast desserts that still feel creative and fun.

8. Cookies and Cream Icebox Dessert

Cookies and Cream Icebox Dessert

Cookies and cream icebox dessert is one of the easiest no-bake treats you can prepare when you need something rich, creamy, and guaranteed to impress. This chilled layered dessert combines chocolate sandwich cookies with fluffy whipped cream and creamy pudding to create a soft cake-like texture after refrigeration. Every spoonful melts in your mouth with a combination of creamy vanilla filling and deep chocolate cookie flavor that tastes comforting and indulgent at the same time.

Visually, this dessert looks elegant and luxurious despite requiring very little effort. The dramatic layers of dark cookies and pale cream filling create a beautiful contrast that looks stunning in clear dishes or neatly sliced squares. Topped with crushed cookies, chocolate drizzle, and whipped cream swirls, this dessert easily becomes the centerpiece of any dessert table while remaining incredibly beginner-friendly.

What is Special About This Recipe

What makes this dessert so special is the magical transformation that happens while it chills. The cookies absorb moisture from the cream filling and soften into tender cake-like layers without any baking at all. This creates a rich dessert texture that feels far more complicated than it actually is.

Another major advantage is convenience. This recipe can be assembled ahead of time and refrigerated until needed, making it perfect for busy moms managing packed schedules, parties, school events, or family dinners.

The flavor combination is also universally loved. Chocolate cookies and creamy vanilla filling create a classic cookies-and-cream taste that appeals to both children and adults. The dessert is easy to customize as well by adding peanut butter drizzle, caramel sauce, espresso powder, or fresh berries between the layers.

Because there is no oven involved, this recipe is especially useful during warmer months when you want dessert without heating the kitchen.

Ingredients

  • 2 packages chocolate sandwich cookies
  • 2 cups whipped cream or whipped topping
  • 1 package instant vanilla pudding
  • 1 1/2 cups cold milk
  • 1 teaspoon vanilla extract
  • Optional chocolate syrup for topping
  • Crushed cookies for garnish

Preparation Instructions

Prepare the vanilla pudding according to package instructions using cold milk. Stir in the vanilla extract and allow the pudding to thicken slightly. Gently fold half of the whipped cream into the pudding mixture to create a lighter, fluffier filling.

In a rectangular dish or serving tray, arrange a layer of chocolate sandwich cookies across the bottom. Spread a layer of the pudding mixture evenly over the cookies. Repeat the layers until all ingredients are used, finishing with a creamy layer on top.

Spread the remaining whipped cream over the final layer and garnish with crushed cookies and optional chocolate syrup drizzle. Refrigerate the dessert for at least four hours, though overnight chilling creates the best texture.

Avoid assembling the dessert too close to serving time because the cookies need enough time to soften properly. Also avoid using warm pudding, which can make the layers loose and messy.

This cookies and cream icebox dessert delivers rich bakery-style flavor with almost no stress involved. Its creamy texture, chocolatey layers, and easy preparation make it one of the most reliable last-minute desserts for busy moms who want maximum flavor with minimal work.

9. Lemon Cream Pie Cups

Lemon Cream Pie Cups

Lemon cream pie cups are bright, refreshing, and beautifully creamy desserts that instantly bring freshness to any dessert table. These no-bake treats feature buttery cookie crumbs layered with silky lemon cream filling and fluffy whipped topping inside elegant serving glasses. The balance between sweet creaminess and vibrant citrus flavor creates a dessert that feels light, refreshing, and incredibly satisfying.

The vibrant pale-yellow filling combined with white whipped cream and fresh lemon slices creates a visually stunning dessert that looks clean, modern, and irresistible. Busy moms love this recipe because it requires minimal preparation while still delivering bakery-quality presentation and flavor.

What is Special About This Recipe

The refreshing lemon flavor is what truly makes these pie cups stand out. While many quick desserts can feel overly rich or heavy, lemon brings brightness and freshness that keeps the dessert balanced and easy to enjoy.

Another special feature is the no-bake preparation. Traditional lemon pies often involve pie crusts, baking, and cooling times, but these pie cups simplify the process while still capturing the creamy citrus flavor everyone loves.

The individual servings also make this dessert especially convenient for parties, gatherings, and family dinners. They are easy to transport, serve, and store without messy slicing or plating.

This recipe is also versatile enough to adapt to different flavors. Lime, orange, or mixed citrus variations work beautifully using the same preparation method.

Ingredients

  • 1 cup crushed vanilla cookies or graham crackers
  • 3 tablespoons melted butter
  • 1 package cream cheese, softened
  • 1/2 cup powdered sugar
  • 1/4 cup fresh lemon juice
  • 1 teaspoon lemon zest
  • 1 cup whipped cream
  • Lemon slices for garnish

Preparation Instructions

Combine the crushed cookies with melted butter until evenly coated. Spoon a layer of crumbs into the bottom of each serving cup and press gently to create a base.

In a mixing bowl, beat the cream cheese until smooth and creamy. Add powdered sugar, lemon juice, and lemon zest, mixing until fully combined and silky. Fold in the whipped cream carefully to maintain a light airy texture.

Spoon or pipe the lemon filling over the cookie crust layer. Top with additional whipped cream and garnish with fresh lemon slices or extra zest.

Refrigerate the cups for at least one hour before serving to allow the filling to firm slightly and develop better flavor.

Avoid adding too much lemon juice because excess liquid can make the filling loose instead of creamy. Always use fresh lemon juice for the brightest flavor rather than bottled juice.

These lemon cream pie cups are refreshing, creamy, and elegant while still being incredibly simple to prepare. Their bright citrus flavor and beautiful presentation make them perfect for busy moms needing fast desserts that feel light, fresh, and impressive.

11. Brownie Ice Cream Sundae Cups

Brownie Ice Cream Sundae Cups

Brownie ice cream sundae cups are rich, decadent desserts layered with fudgy brownies, creamy ice cream, chocolate sauce, whipped cream, and crunchy toppings. These dessert cups combine multiple favorite sweets into one irresistible treat that feels fun, indulgent, and restaurant-worthy. The contrast between warm brownie pieces and cold melting ice cream creates a luxurious dessert experience that instantly satisfies any sweet craving.

Served in clear glasses or modern dessert cups, these sundaes look dramatic and visually exciting. Layers of chocolate brownie chunks, creamy vanilla ice cream, glossy fudge sauce, crushed cookies, caramel drizzle, and whipped cream make every spoonful packed with flavor and texture.

What is Special About This Recipe

The greatest strength of this dessert is its flexibility and convenience. Store-bought brownies, leftover homemade brownies, or even brownie bites can all be used successfully, making the recipe incredibly fast and adaptable for busy schedules.

Another thing that makes these sundae cups special is the contrast of temperatures and textures. The fudgy brownies provide richness while the cold ice cream adds creaminess and refreshment. Crunchy toppings complete the dessert by adding texture and excitement.

The layered presentation also creates a premium dessert appearance with almost no effort. Even simple ingredients look luxurious when layered beautifully in clear glasses.

These sundae cups are perfect for celebrations, movie nights, birthdays, or family dessert nights because they feel fun, customizable, and comforting.

Ingredients

  • 2 cups brownie pieces
  • 2 cups vanilla ice cream
  • 1/2 cup chocolate fudge sauce
  • 1/4 cup caramel sauce
  • Whipped cream
  • Crushed cookies or nuts
  • Maraschino cherries for garnish

Preparation Instructions

Place brownie pieces at the bottom of each serving cup. Add a scoop of vanilla ice cream over the brownies, then drizzle generously with chocolate fudge sauce and caramel.

Repeat the layers if using larger serving glasses. Top with whipped cream, crushed cookies or nuts, and maraschino cherries for a classic sundae presentation.

Serve immediately for the best texture and appearance. If the brownies are cold, warming them slightly before layering creates an even better contrast with the ice cream.

Avoid adding sauces too early if storing temporarily because they can melt the ice cream quickly. Assemble shortly before serving for the cleanest layered look.

These brownie ice cream sundae cups deliver the ultimate comfort dessert experience with minimal preparation. Their rich chocolate flavor, creamy layers, and dramatic presentation make them perfect for busy moms who want an easy dessert that still feels exciting and indulgent.

12. No-Bake Banana Pudding Dessert Cups

No-Bake Banana Pudding Dessert Cups

No-bake banana pudding dessert cups are creamy, comforting, and packed with nostalgic homemade flavor. These layered desserts combine smooth vanilla pudding, fresh banana slices, whipped cream, and vanilla cookies into soft creamy cups that taste rich yet refreshing. As the dessert chills, the cookies soften slightly and blend beautifully with the pudding to create a classic Southern-style dessert texture.

The layered presentation makes these dessert cups especially beautiful. Pale vanilla cream, golden cookies, fresh banana slices, and fluffy whipped cream create an inviting dessert that looks cozy, homemade, and irresistible.

What is Special About This Recipe

What makes banana pudding dessert cups so special is their comforting homemade flavor combined with incredibly simple preparation. They require no baking, minimal equipment, and very little time while still tasting rich and satisfying.

The balance of flavors and textures is another reason people love this dessert. The soft bananas add freshness while the vanilla pudding creates creaminess and the cookies provide texture.

These cups are also ideal for preparing ahead of time because the flavors improve as the dessert chills. Busy moms especially appreciate desserts that can be made earlier in the day and served later without stress.

The recipe is also easy to customize with caramel drizzle, cinnamon, peanut butter, or crushed toffee toppings for extra flavor.

Ingredients

  • 1 package instant vanilla pudding
  • 2 cups cold milk
  • 2 bananas, sliced
  • 1 cup whipped cream
  • Vanilla wafers or cookies
  • 1 teaspoon vanilla extract
  • Optional caramel drizzle

Preparation Instructions

Prepare the vanilla pudding according to package instructions using cold milk. Stir in the vanilla extract and refrigerate briefly until slightly thickened.

In serving cups, place a layer of vanilla wafers at the bottom followed by banana slices and pudding. Repeat the layers until the cups are filled.

Top with whipped cream and additional crushed wafers for garnish. Refrigerate for at least one hour before serving to allow the flavors to blend and the cookies to soften slightly.

Avoid slicing bananas too early because they can brown quickly. If necessary, lightly coat the banana slices with lemon juice to preserve freshness.

These no-bake banana pudding dessert cups are creamy, nostalgic, and wonderfully easy to prepare. Their comforting homemade flavor and effortless preparation make them the perfect final addition to any collection of quick dessert recipes for busy moms needing delicious last-minute treats.

13. Nutella Stuffed Crescent Rolls

Nutella Stuffed Crescent Rolls

Nutella stuffed crescent rolls are one of the fastest bakery-style desserts you can make when you need something warm, flaky, and incredibly comforting. These golden pastries feature buttery crescent dough wrapped around rich chocolate hazelnut spread that melts beautifully while baking. The outside becomes crisp and golden while the inside stays warm, creamy, and irresistibly gooey. Finished with powdered sugar or chocolate drizzle, these pastries look elegant enough for guests while being simple enough for even the busiest weekday evenings.

The smell alone is enough to draw everyone into the kitchen. Warm buttery pastry combined with melted chocolate creates a comforting bakery aroma that instantly makes the house feel cozy. Served fresh from the oven with coffee, milk, or hot chocolate, these crescent rolls quickly become a family favorite.

What is Special About This Recipe

What makes these crescent rolls special is their incredible balance between simplicity and flavor. Using refrigerated crescent dough eliminates complicated pastry preparation while still delivering flaky bakery-style texture.

The Nutella filling creates a rich creamy center that feels luxurious without requiring multiple ingredients or advanced baking skills. This dessert also works beautifully for both casual family snacks and more elegant dessert platters.

Another major advantage is versatility. You can add sliced bananas, strawberries, peanut butter, marshmallows, or crushed nuts inside the rolls to create different flavor combinations while keeping the preparation fast and simple.

Because these pastries bake quickly and require minimal cleanup, they are ideal for busy moms who want homemade desserts without spending hours in the kitchen.

Ingredients

  • 1 can refrigerated crescent roll dough
  • 1/2 cup Nutella or chocolate hazelnut spread
  • 1 tablespoon melted butter
  • Powdered sugar for garnish
  • Optional sliced strawberries or bananas

Preparation Instructions

Preheat the oven to 375°F and line a baking tray with parchment paper. Unroll the crescent dough and separate it into individual triangles.

Spread a spoonful of Nutella onto the wider end of each triangle. Avoid overfilling because excess filling may leak during baking. If desired, add thin banana slices or strawberry pieces on top of the Nutella.

Roll the dough from the wide end toward the pointed tip and place the crescents onto the prepared baking tray. Brush lightly with melted butter for a deeper golden finish.

Bake for 10 to 12 minutes or until puffed and golden brown. Allow them to cool slightly before dusting with powdered sugar or drizzling with melted chocolate.

Avoid overbaking because the filling can become overly hot and the pastry may dry out. Serve warm for the best gooey texture.

These Nutella stuffed crescent rolls prove that quick desserts can still feel luxurious and comforting. Their flaky pastry, creamy filling, and beautiful golden appearance make them perfect for busy moms needing a dependable last-minute sweet treat.

14. Five-Minute Oreo Milkshake Floats

Five-Minute Oreo Milkshake Floats

Five-minute Oreo milkshake floats are thick, creamy, ice-cold desserts that combine cookies-and-cream flavor with the fun of a classic diner-style float. This dessert blends vanilla ice cream, crushed Oreo cookies, and milk into a rich milkshake, then tops it with whipped cream, extra cookie crumbs, chocolate drizzle, and sparkling soda for a fizzy creamy finish.

Served in tall clear glasses with overflowing whipped cream and cookie crumbles, these milkshake floats instantly grab attention. They feel fun, nostalgic, and indulgent while taking only minutes to prepare. Busy moms especially love them because there is no baking, chilling, or complicated preparation involved.

What is Special About This Recipe

The combination of creamy milkshake and fizzy float texture is what makes this dessert unique and exciting. The soda adds a refreshing lightness that balances the richness of the ice cream and cookies beautifully.

Another reason this recipe stands out is speed. In less than five minutes, you can create a dessert that feels restaurant-quality and visually impressive. This makes it perfect for busy evenings, sleepovers, birthday parties, or surprise treats for the kids.

The recipe is also endlessly customizable. Different cookie flavors, ice cream varieties, or toppings can completely transform the dessert while keeping the same simple method.

Because everything is blended and assembled quickly, cleanup is minimal and stress-free.

Ingredients

  • 3 cups vanilla ice cream
  • 1 cup milk
  • 8 Oreo cookies
  • 1 cup cream soda or cola
  • Whipped cream
  • Chocolate syrup
  • Extra crushed Oreos for garnish

Preparation Instructions

Place the vanilla ice cream, milk, and Oreo cookies into a blender. Blend until thick, smooth, and creamy. If the milkshake is too thick, add a small splash of milk to loosen it slightly.

Pour the milkshake mixture into tall serving glasses, filling them about three-quarters full. Slowly pour cream soda or cola into each glass to create the float effect.

Top generously with whipped cream, chocolate syrup, and crushed Oreos. Serve immediately with straws and long spoons.

Avoid overblending because the milkshake can become too thin. Also pour the soda slowly to prevent excessive foam overflow.

These five-minute Oreo milkshake floats are creamy, crunchy, refreshing, and incredibly fun. Their rich cookies-and-cream flavor and dramatic presentation make them perfect for busy moms who want fast desserts that still feel exciting and memorable.

15. Fried Cinnamon Banana Bites

Fried Cinnamon Banana Bites

Fried cinnamon banana bites are warm caramelized treats that transform simple bananas into something incredibly comforting and flavorful. Slices of banana are lightly coated, pan-fried until golden, and tossed in cinnamon sugar for a sweet crispy finish. The inside becomes soft and creamy while the outside develops a delicate golden crust packed with buttery cinnamon flavor.

Served with caramel sauce, chocolate drizzle, or vanilla ice cream, these banana bites feel cozy and indulgent while using only a few simple ingredients. Their warm golden appearance and sweet aroma make them especially irresistible during cooler evenings or family dessert nights.

What is Special About This Recipe

One of the most special things about this recipe is how quickly it turns everyday bananas into a dessert that feels gourmet and comforting. It is one of the best examples of how simple ingredients can create incredible flavor with very little effort.

The caramelization process naturally enhances the sweetness of the bananas, creating rich flavor without needing excessive sugar. The cinnamon coating also adds warmth and bakery-style aroma that makes the dessert feel homemade and nostalgic.

Another major advantage is versatility. These banana bites pair beautifully with pancakes, waffles, ice cream, yogurt, or even oatmeal, making them useful beyond dessert alone.

Because they cook quickly in a pan, they are ideal for busy moms who want warm desserts without turning on the oven.

Ingredients

  • 3 bananas, sliced
  • 2 tablespoons butter
  • 1/4 cup granulated sugar
  • 1 teaspoon cinnamon
  • Optional caramel or chocolate sauce

Preparation Instructions

Slice the bananas into thick rounds to help them hold their shape during cooking. In a small bowl, combine the sugar and cinnamon.

Melt the butter in a skillet over medium heat. Add the banana slices in a single layer and cook for about 1 to 2 minutes per side until golden brown and lightly caramelized.

Sprinkle the cinnamon sugar mixture over the bananas while cooking, allowing it to coat evenly and create a slightly crisp exterior.

Serve immediately while warm with optional caramel sauce, chocolate drizzle, or vanilla ice cream.

Avoid overcrowding the skillet because the bananas can become mushy instead of caramelized. Also avoid using overly ripe bananas, which may break apart during cooking.

These fried cinnamon banana bites are warm, comforting, and packed with rich caramelized flavor. Their quick preparation and irresistible texture make them one of the easiest last-minute desserts for busy moms needing something simple yet incredibly satisfying.

16. Raspberry White Chocolate Dessert Cups

Raspberry White Chocolate Dessert Cups

Raspberry white chocolate dessert cups are elegant no-bake treats filled with silky white chocolate cream, fresh raspberries, and delicate cookie crumbs layered beautifully in individual serving glasses. The sweetness of the white chocolate pairs perfectly with the tartness of fresh raspberries, creating a dessert that feels rich yet balanced and refreshing.

The visual presentation is absolutely stunning. Bright red raspberries against smooth white cream create a luxurious contrast that instantly catches attention. Finished with white chocolate curls and fresh berries, these dessert cups look like something served at an upscale café while remaining incredibly easy to prepare at home.

What is Special About This Recipe

The combination of tart raspberries and creamy white chocolate is what makes this dessert truly special. The flavors balance each other beautifully, preventing the dessert from becoming overly sweet while still feeling indulgent.

Another major advantage is presentation. The layered design creates a professional elegant appearance with very little effort, making these dessert cups perfect for gatherings, celebrations, or Pinterest-worthy dessert displays.

These cups are also ideal for preparing ahead of time. Chilling enhances the flavor and texture while reducing last-minute stress for busy moms managing multiple responsibilities.

The recipe is highly adaptable as well. Strawberries, blueberries, blackberries, or mango can all replace raspberries depending on personal preference or seasonal availability.

Ingredients

  • 1 cup white chocolate chips
  • 1 cup heavy cream
  • 1/2 cup cream cheese, softened
  • 1/4 cup powdered sugar
  • 1 cup fresh raspberries
  • 1 cup crushed vanilla cookies
  • White chocolate curls for garnish

Preparation Instructions

Melt the white chocolate gently using short microwave intervals or a double boiler, stirring until smooth. Allow it to cool slightly.

In a bowl, beat the cream cheese and powdered sugar until smooth and creamy. In a separate bowl, whip the heavy cream until soft peaks form. Fold the whipped cream into the cream cheese mixture, then gently fold in the melted white chocolate.

Layer crushed cookies into the bottom of serving glasses followed by the white chocolate filling and fresh raspberries. Repeat the layers until the glasses are filled.

Top with extra raspberries and white chocolate curls for an elegant finish. Chill for at least one hour before serving.

Avoid overheating the white chocolate because it can become thick and grainy. Also handle raspberries gently to preserve their shape and freshness.

These raspberry white chocolate dessert cups are creamy, fruity, elegant, and beautifully refreshing. Their luxurious appearance and balanced flavor make them the perfect ending to a collection of quick easy dessert recipes designed for busy moms needing delicious last-minute treats.

Leave a Comment

Your email address will not be published. Required fields are marked *

Scroll to Top