Getting elementary school kids excited about dinner can sometimes feel like an impossible task. One day they love a certain food, and the next day they refuse to touch it. Many parents know the frustration of preparing a nutritious meal only to watch their child push the plate away after a single glance. Finding recipes that are both kid-approved and parent-approved can be a challenge, especially when you want something homemade, flavorful, and satisfying.
That is exactly why these Crispy Garlic Parmesan Chicken Tenders have become a favorite in so many households. They combine everything children tend to love about classic chicken tenders—crispy coating, juicy chicken, and easy-to-hold portions—with the irresistible flavors of garlic and Parmesan cheese. The result is a meal that feels fun and familiar while offering a homemade touch that is far superior to most frozen versions.
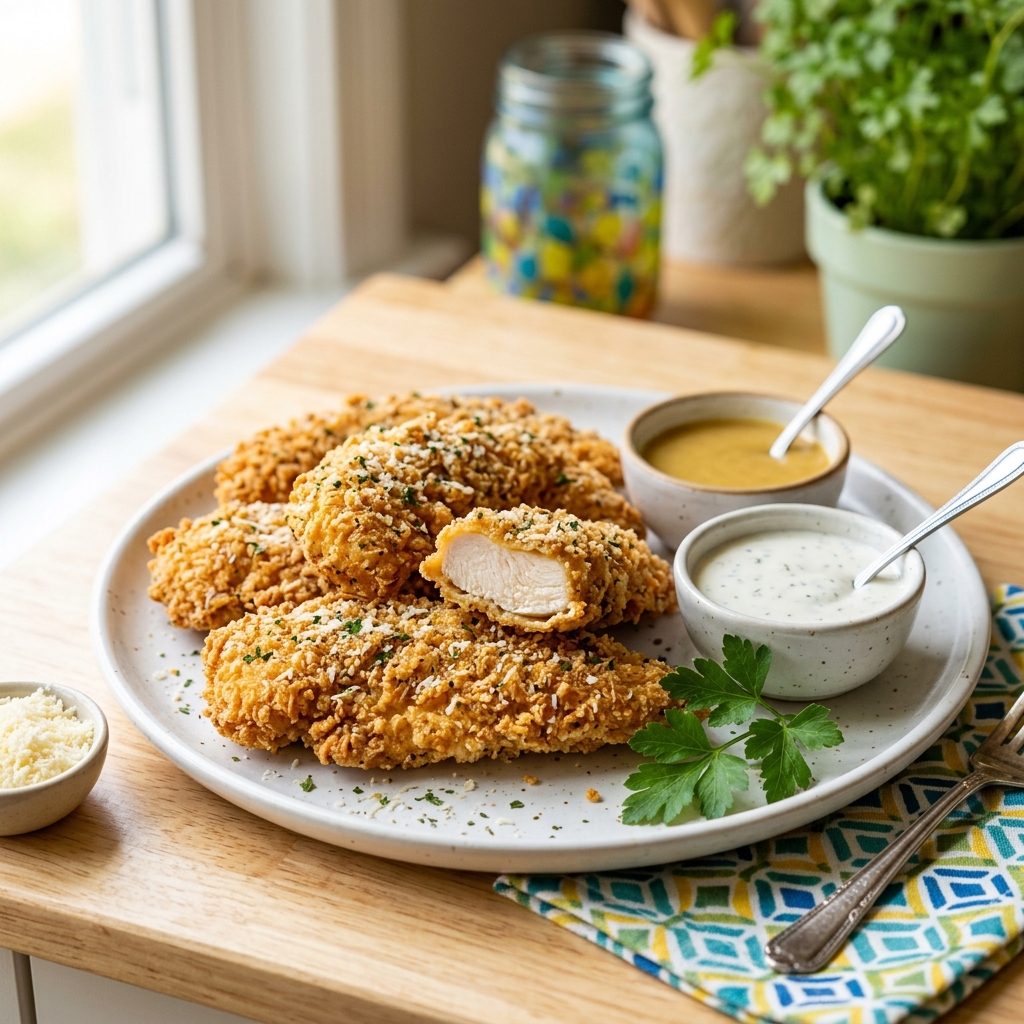
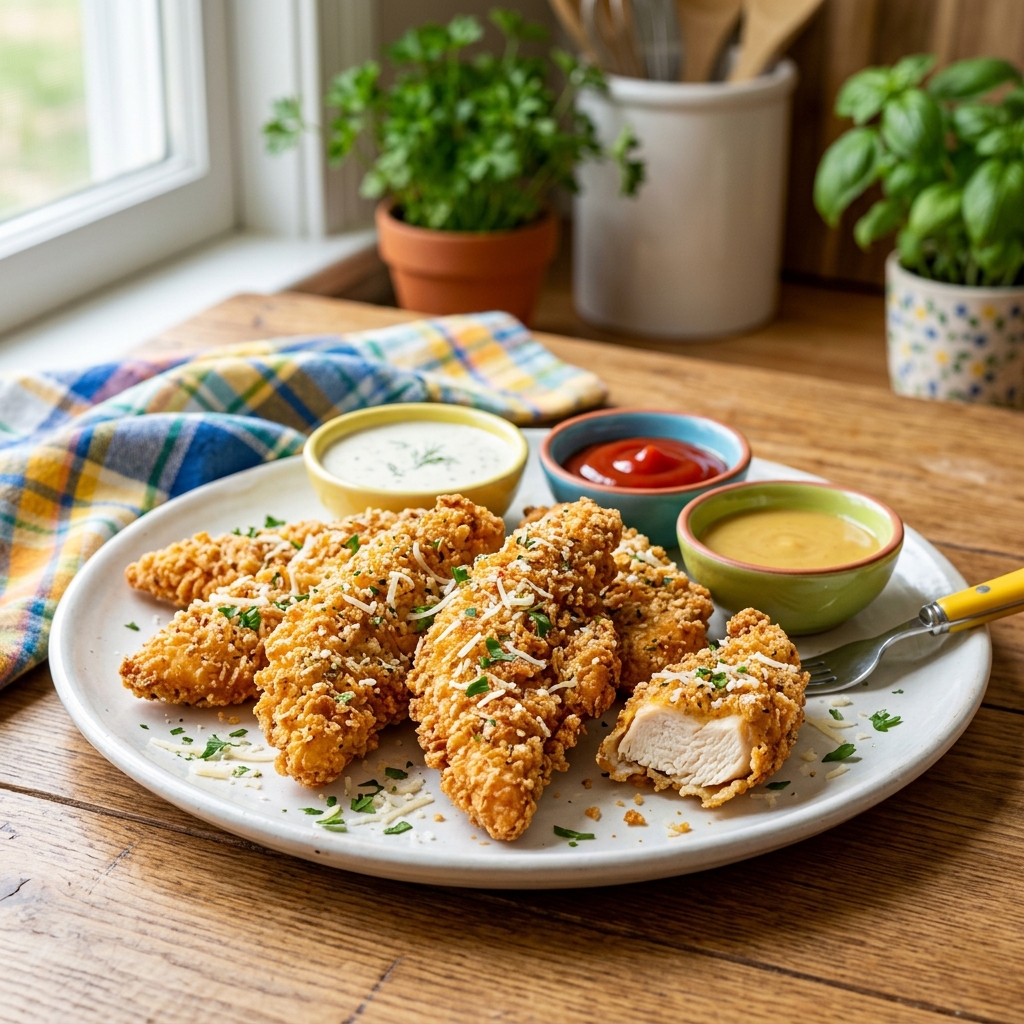
These chicken tenders are golden, crunchy, and packed with flavor. They have a crispy exterior that delivers the satisfying crunch kids crave while keeping the inside tender and juicy. The Parmesan cheese adds a rich, savory depth, while garlic enhances the overall taste without becoming overpowering. Even children who are hesitant about trying new foods often find these tenders appealing because the flavors are balanced and comforting.
Another reason parents love this recipe is its versatility. It works equally well for weeknight dinners, school lunch preparations, after-school snacks, family gatherings, and even birthday parties. Whether served with dipping sauces, vegetables, or favorite side dishes, these chicken tenders can easily become a regular part of your family meal rotation.
Why These Chicken Tenders Are So Popular with Picky Kids
Many recipes claim to be kid-friendly, but not all of them truly understand what attracts children to certain foods. Crispy Garlic Parmesan Chicken Tenders succeed because they focus on the characteristics that children naturally enjoy.
First, the texture is incredibly important. Children often respond strongly to texture, and a crunchy coating creates a satisfying eating experience. The contrast between the crispy outside and juicy inside makes every bite enjoyable.
Second, the flavors are approachable. While garlic and Parmesan provide plenty of taste, they do not overwhelm sensitive palates. The seasoning enhances the chicken rather than masking it, creating a flavor profile that feels familiar and comforting.
Parents also appreciate that these tenders can be baked or air-fried instead of deep-fried. This allows families to enjoy a crispy result without excessive oil. The homemade preparation also gives parents greater control over ingredients, helping them avoid unnecessary additives and preservatives commonly found in many store-bought products.
Perhaps most importantly, these chicken tenders create positive mealtime experiences. When children find a meal they genuinely enjoy, family dinners become more relaxed and enjoyable for everyone involved.
The Secret Behind Extra Crispy Homemade Chicken Tenders
The difference between ordinary chicken tenders and truly exceptional ones comes down to a few key techniques.
One of the most important factors is using a combination of Parmesan cheese and breadcrumbs. Parmesan contributes both flavor and texture. As it cooks, it helps create a beautifully crisp crust that turns golden brown and delicious.
Another crucial element is the coating process. Properly breading the chicken creates multiple layers that help lock in moisture while forming a crunchy exterior. Skipping steps or rushing the process can lead to a coating that falls off during cooking.
The choice of breadcrumbs also matters. Panko breadcrumbs are often preferred because they are lighter and flakier than traditional breadcrumbs. Their larger structure creates a crunchier texture that remains crisp even after cooling slightly.
Finally, cooking temperature plays a significant role. High heat allows the coating to become crispy while keeping the chicken tender and juicy inside. This balance is what transforms a simple chicken tender into a restaurant-quality meal.
Ingredients
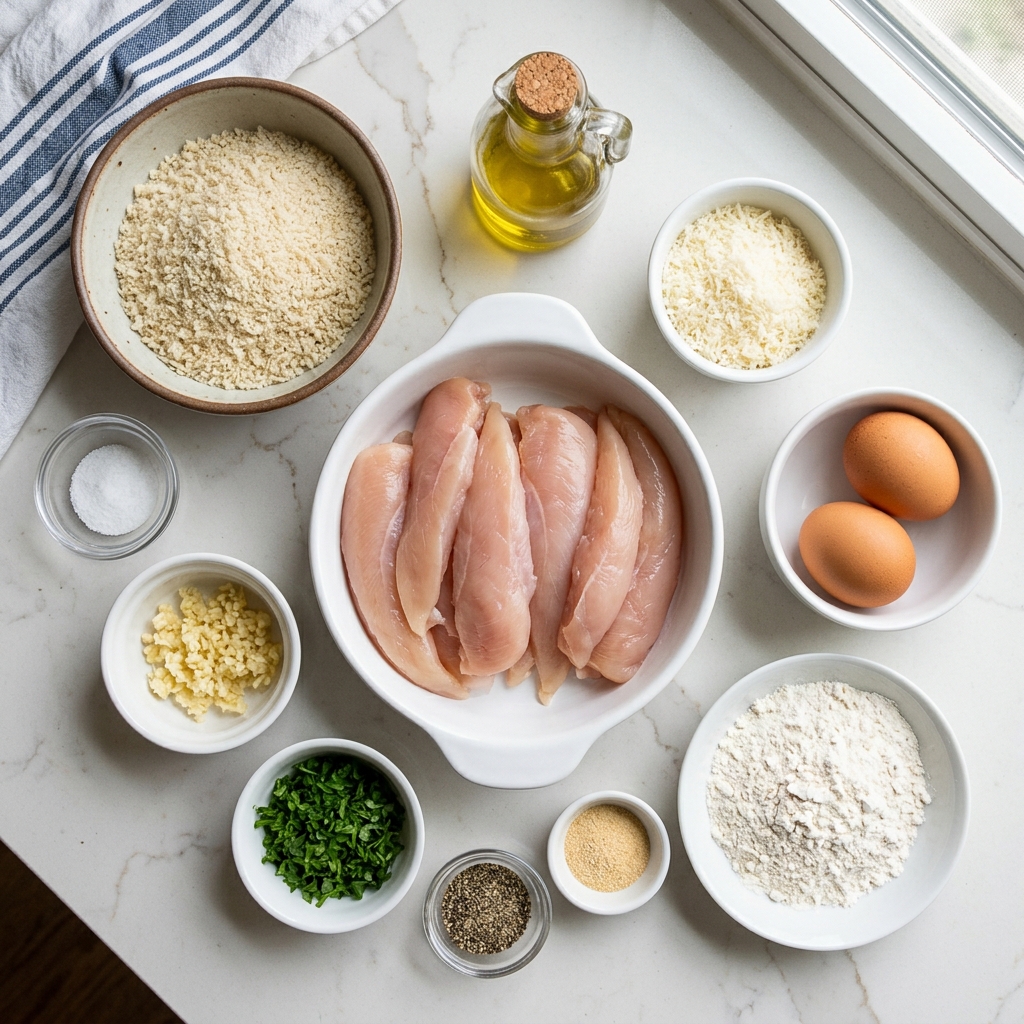
One of the best aspects of this recipe is that it uses simple ingredients that are easy to find in most grocery stores.
For the Chicken Tenders
- 1½ pounds chicken tenderloins or chicken breasts cut into strips
- 1 cup all-purpose flour
- 2 large eggs
- 2 tablespoons milk
- 1½ cups panko breadcrumbs
- ¾ cup freshly grated Parmesan cheese
- 1 teaspoon garlic powder
- 1 teaspoon onion powder
- 1 teaspoon paprika
- 1 teaspoon salt
- ½ teaspoon black pepper
- 2 tablespoons olive oil or cooking spray
Ingredient Notes
Chicken Tenderloins
Chicken tenderloins are naturally tender and cook quickly, making them ideal for children. If tenderloins are unavailable, boneless skinless chicken breasts sliced into strips work perfectly.
Parmesan Cheese
Freshly grated Parmesan provides the best flavor and texture. Pre-shredded varieties can be used, but freshly grated cheese typically melts and crisps more effectively.
Panko Breadcrumbs
Panko creates a lighter and crunchier coating than standard breadcrumbs. This ingredient is one of the secrets behind achieving that irresistible crispy texture.
Garlic Powder
Garlic powder distributes evenly throughout the coating, ensuring every bite contains consistent flavor.
Eggs and Milk
The egg mixture helps the breadcrumb coating adhere properly to the chicken, creating a sturdy crust during cooking.
Step-by-Step Preparation Guide
Step 1: Prepare the Chicken
Begin by patting the chicken dry using paper towels. Removing excess moisture helps the coating stick more effectively and promotes better browning during cooking.
If using chicken breasts, cut them into evenly sized strips. Consistent sizing ensures that all pieces cook evenly.
Place the chicken in a large bowl and set aside while preparing the coating stations.
Step 2: Create the Breading Station
Prepare three shallow bowls.
In the first bowl, combine:
- Flour
- Half of the salt
- Half of the pepper
Mix thoroughly.
In the second bowl, whisk together:
- Eggs
- Milk
Continue whisking until completely smooth.
In the third bowl, combine:
- Panko breadcrumbs
- Parmesan cheese
- Garlic powder
- Onion powder
- Paprika
- Remaining salt
- Remaining pepper
Mix until evenly distributed.
Having these stations organized before breading will make the process quicker and cleaner.
Step 3: Coat the Chicken
Take one piece of chicken and dredge it in the flour mixture.
Shake off any excess flour before dipping it into the egg mixture.
Allow excess egg to drip away, then transfer the chicken to the breadcrumb mixture.
Press the breadcrumb coating firmly onto all sides of the chicken. This step is important because it helps create a thick, crunchy crust.
Place the coated chicken on a baking sheet or plate.
Repeat until all chicken pieces are breaded.
Step 4: Rest the Coated Chicken
Allow the breaded chicken to rest for about 10 minutes before cooking.
Many home cooks skip this step, but it can make a significant difference. Resting allows the coating to adhere more securely to the chicken, reducing the chance of it falling off during cooking.
Meanwhile, preheat your oven or air fryer.
Step 5: Cooking in the Oven
Preheat the oven to 425°F (220°C).
Line a baking sheet with parchment paper or lightly grease it.
Arrange the chicken tenders in a single layer, leaving space between each piece.
Lightly brush or spray the tops with olive oil.
Bake for 10 minutes.
Carefully flip each tender and continue baking for another 8–10 minutes, or until golden brown and cooked through.
The internal temperature should reach 165°F (74°C).
Step 6: Cooking in the Air Fryer
Preheat the air fryer to 400°F (200°C).
Arrange the chicken tenders in a single layer inside the basket. Avoid overcrowding.
Lightly spray the tops with cooking spray.
Cook for 8 minutes.
Flip the tenders and cook for an additional 5–7 minutes.
The coating should become deeply golden and crispy while the chicken remains juicy inside.
Step 7: Let Them Rest
Once cooked, transfer the chicken tenders to a serving plate and allow them to rest for 3–5 minutes.
This brief resting period helps the juices redistribute throughout the chicken, resulting in a more tender and flavorful bite.
Serve immediately while hot and crispy for the best texture and flavor.
Recipe Variations
One of the reasons this recipe is so popular among families is its flexibility. Once you master the basic version, you can easily customize it to suit your family’s preferences or dietary needs.
Extra Cheesy Parmesan Tenders
If your children love cheese, increase the Parmesan cheese to 1 cup instead of ¾ cup. This creates an even richer and more savory crust with a stronger cheesy flavor.
Mild Herb Chicken Tenders
Add dried Italian seasoning, oregano, or parsley to the breadcrumb mixture. These herbs add subtle flavor without making the tenders too bold for picky eaters.
Spicy Version for Older Kids and Adults
For family meals where some members enjoy heat, add a pinch of cayenne pepper or red pepper flakes to the breadcrumb mixture. This creates a gentle kick while maintaining the garlic Parmesan flavor.
Gluten-Free Version
Replace the flour with a gluten-free flour blend and use gluten-free panko breadcrumbs. The tenders will still develop a crispy coating and delicious flavor.
Ranch Parmesan Tenders
Mix one tablespoon of ranch seasoning into the breadcrumb mixture. This variation is especially popular with children who already enjoy ranch-flavored snacks and dips.
Mini Chicken Nugget Style
Cut the chicken into bite-sized pieces instead of strips. This variation works particularly well for younger elementary school children who prefer smaller portions.
Lemon Garlic Parmesan Tenders
Add a teaspoon of finely grated lemon zest to the breadcrumb mixture. The fresh citrus flavor brightens the dish and pairs beautifully with the Parmesan cheese.
Expert Tips for Perfect Chicken Tenders Every Time
Professional chefs rely on small techniques that make a significant difference in the final result. These tips will help you create restaurant-quality chicken tenders at home.
Use Freshly Grated Parmesan
Fresh Parmesan melts and crisps more effectively than pre-packaged grated cheese. It also provides a richer flavor that enhances the entire coating.
Don’t Skip Drying the Chicken
Excess moisture can prevent the coating from adhering properly. Taking a minute to pat the chicken dry greatly improves the final texture.
Press the Breadcrumbs Firmly
Rather than simply rolling the chicken through the breadcrumbs, gently press the coating onto the surface. This creates a thicker crust and reduces the risk of breadcrumbs falling off during cooking.
Avoid Overcrowding
Whether baking or air frying, leave space between each chicken tender. Proper airflow helps the coating become evenly crispy and golden brown.
Use a Wire Rack When Baking
If available, place the chicken on a wire rack positioned over a baking sheet. This allows hot air to circulate around the tenders, producing a crispier result.
Monitor Cooking Time Carefully
Chicken tenders cook quickly. Overcooking can cause them to become dry. Using a meat thermometer ensures perfect results every time.
Serve Immediately
Like most crispy foods, these chicken tenders are best enjoyed fresh from the oven or air fryer. The coating is at its crunchiest when served right away.
Make-Ahead Options
Busy families often need meals that can be prepared ahead of time. Fortunately, these chicken tenders are ideal for advance preparation.
Prepare the Chicken in Advance
The chicken can be breaded up to 24 hours before cooking.
Arrange the breaded tenders on a baking sheet and cover them tightly with plastic wrap. Store them in the refrigerator until ready to cook.
This method can actually improve the coating’s ability to adhere to the chicken.
Freeze Before Cooking
Place the breaded tenders on a baking sheet and freeze until solid.
Transfer them to a freezer-safe container or freezer bag.
They can be stored for up to three months.
When ready to cook, bake or air fry directly from frozen, adding several extra minutes to the cooking time.
Meal Prep for School Lunches
Cook the chicken tenders in advance and store them in the refrigerator. They can be reheated and packed in lunch containers alongside fruits, vegetables, and dipping sauces for a balanced meal.
What to Serve with Crispy Garlic Parmesan Chicken Tenders
These chicken tenders pair wonderfully with a wide variety of side dishes. Whether you’re planning a simple family dinner or a special gathering, there are plenty of delicious options.
Dipping Sauces
- Ranch dressing
- Honey mustard
- Ketchup
- Barbecue sauce
- Garlic aioli
- Marinara sauce
- Cheese sauce
Vegetables
- Carrot sticks
- Cucumber slices
- Steamed broccoli
- Roasted green beans
- Sweet corn
- Bell pepper strips
Potato Sides
- French fries
- Sweet potato fries
- Roasted potatoes
- Mashed potatoes
- Potato wedges
Fresh Salads
- Garden salad
- Caesar salad
- Cucumber salad
- Coleslaw
- Pasta salad
Kid-Friendly Sides
- Macaroni and cheese
- Buttered noodles
- Rice pilaf
- Dinner rolls
- Fruit salad
Healthy Pairings
For a balanced meal, serve the chicken tenders with fresh vegetables and a fruit side. This combination provides protein, fiber, vitamins, and minerals while still feeling like a fun meal.
How to Store Crispy Garlic Parmesan Chicken Tenders
Proper storage helps preserve both flavor and texture.
Refrigerator Storage
Allow the chicken tenders to cool completely before storing.
Place them in an airtight container and refrigerate for up to four days.
Freezer Storage
Arrange cooled tenders in a single layer on a baking sheet.
Freeze until solid, then transfer to a freezer-safe container.
Store for up to three months.
Reheating Instructions
For the best texture, avoid microwaving whenever possible.
Oven Method
Preheat the oven to 375°F (190°C).
Bake for 8–10 minutes until heated through and crispy.
Air Fryer Method
Reheat at 375°F (190°C) for 3–5 minutes.
This method restores much of the original crispiness.
Microwave Method
If time is limited, microwave in short intervals until heated through. While convenient, the coating may lose some of its crunch.
Frequently Asked Questions
Can I use chicken breasts instead of chicken tenderloins?
Absolutely. Simply slice boneless skinless chicken breasts into evenly sized strips. They work just as well and are often more readily available.
Why are my chicken tenders not crispy?
The most common causes are excess moisture on the chicken, overcrowding during cooking, or insufficient cooking temperature. Be sure to pat the chicken dry and cook at the recommended temperature.
Can I make these without Parmesan cheese?
Yes. The recipe will still work with only breadcrumbs and seasonings. However, Parmesan contributes significant flavor and helps create an extra crispy coating.
Are these suitable for school lunches?
Yes. They can be prepared in advance, refrigerated, and packed in lunch containers. Include a favorite dipping sauce and some fresh fruit or vegetables for a complete lunch.
Can I freeze cooked chicken tenders?
Yes. Allow them to cool completely before freezing. Reheat in the oven or air fryer for the best texture.
What dipping sauce do kids usually prefer?
Ketchup, ranch dressing, and honey mustard tend to be the most popular choices among elementary school children.
Can I make this recipe dairy-free?
Yes. Simply omit the Parmesan cheese or replace it with a dairy-free Parmesan alternative. The tenders will still be flavorful and crispy.
How do I know when the chicken is fully cooked?
The safest method is using a meat thermometer. The internal temperature should reach 165°F (74°C).
Can I deep fry these chicken tenders?
Yes. Heat oil to 350°F (175°C) and fry for approximately 3–5 minutes per side until golden brown and fully cooked.
Can I prepare a large batch for parties?
Definitely. This recipe scales very well and is a popular choice for birthday parties, family gatherings, and school events.
Conclusion
Crispy Garlic Parmesan Chicken Tenders are the perfect solution for families searching for a meal that both children and adults will genuinely enjoy. Their crunchy golden coating, juicy interior, and savory garlic Parmesan flavor create a combination that appeals even to some of the pickiest elementary school kids.
What makes this recipe truly special is its balance of simplicity and versatility. The ingredients are easy to find, the preparation is straightforward, and the results are consistently delicious. Whether served as a weeknight dinner, packed in school lunches, prepared for meal prep, or presented at family gatherings, these chicken tenders deliver comfort, flavor, and convenience.
Once you make them at home, you may find that store-bought chicken tenders no longer compare. With their crispy texture, rich flavor, and family-friendly appeal, these homemade Garlic Parmesan Chicken Tenders are destined to become a favorite recipe that everyone requests again and again.
Crispy Garlic Parmesan Chicken Tenders for Picky Elementary School Kids
Ingredients
Equipment
Method
- Pat the chicken dry with paper towels. If using chicken breasts, slice them into evenly sized strips.
- Place the flour, salt, and pepper in the first bowl.
- In the second bowl, whisk together the eggs and milk.
- In the third bowl, combine the panko breadcrumbs, Parmesan cheese, garlic powder, onion powder, paprika, salt, and pepper.
- Coat each piece of chicken in the flour mixture.
- Dip it into the egg mixture.
- Press it firmly into the Parmesan breadcrumb mixture until fully coated.
- Place the breaded chicken on a tray or baking sheet.
- Allow the coated chicken to rest for 10 minutes. This helps the coating adhere better during cooking.
- Preheat the oven to 425°F (220°C).
- Arrange the chicken tenders in a single layer on a parchment-lined baking sheet.
- Lightly spray or brush with olive oil.
- Bake for 10 minutes.
- Flip and continue baking for 8–10 minutes, or until golden brown and the internal temperature reaches 165°F (74°C).
- Air Fryer Alternative
- Preheat the air fryer to 400°F (200°C).
- Arrange the chicken tenders in a single layer.
- Spray lightly with cooking spray.
- Cook for 8 minutes.
- Flip and cook for an additional 5–7 minutes until crispy and fully cooked.
- Allow the tenders to rest for 3–5 minutes before serving.
- Serve with your favorite dipping sauces such as ranch, honey mustard, ketchup, or barbecue sauce.
Notes
Panko breadcrumbs create a crunchier texture than traditional breadcrumbs.
Do not overcrowd the baking sheet or air fryer basket.
For extra crispiness, place the chicken on a wire rack while baking.
Chicken tenders can be breaded up to 24 hours in advance and stored in the refrigerator until ready to cook.
Leftovers can be refrigerated for up to 4 days.
Freeze cooked or uncooked breaded tenders for up to 3 months.
Reheat in an oven or air fryer to restore crispiness.